POSM Data Sync Tool
The POSM Data Sync Tool connects a local POSM installation with POSM Central.
Data Sync moves inspection data in two directions:
| Tab | Direction | Purpose |
|---|---|---|
| Upload | Local POSM → POSM Central | Upload inspections from the configured local POSM database to POSM Central |
| Backup | POSM Central → Local POSM | Download inspections from POSM Central into the configured local POSM installation |
Upload and Backup
Upload sends local POSM inspection data to POSM Central.
Backup retrieves inspection data from POSM Central and writes it to the local POSM installation.
Launch POSM Data Sync
Open the POSM Data Sync Tool from your computer.

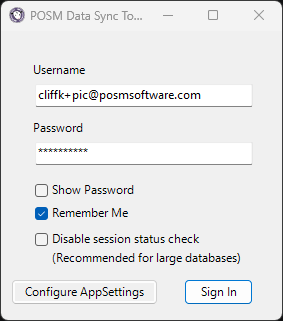
The Data Sync login window opens.
Sign In
Enter your POSM Central:
- Username
- Password
The login window also provides several options.
Show Password
Select Show Password to display the password while entering it.
Remember Me
Select Remember Me when you want Data Sync to remember your login information on the computer.
Disable Session Status Check
Select Disable session status check (Recommended for large databases) to reduce the initial loading time when working with a large POSM database.
This can be useful when the local POSM database contains thousands of sessions.
Configure AppSettings
Select Configure AppSettings to open the App Settings Configuration window.
The configuration window allows you to review or change the database connection, logging settings, POSM Central connection, media locations, and other synchronization settings.
App Settings Configuration
The App Settings Configuration window connects Data Sync to the appropriate POSM database, media locations, logging folders, and POSM Central.
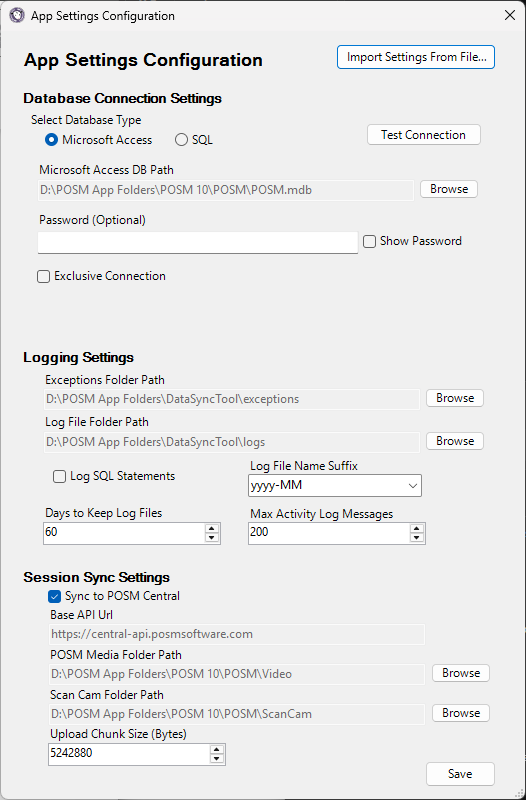
The configuration window contains three main sections:
- Database Connection Settings
- Logging Settings
- Session Sync Settings
An Import Settings From File... option is also available.
POSM Support normally configures Data Sync
POSM Data Sync is generally installed and initially configured by POSM Support.
You can still review the settings or import a previously working configuration when needed.
Data Sync Installation and Setup
Import Settings From a File
Use Import Settings From File... to load an existing Data Sync configuration.
This is useful when reinstalling Data Sync, moving Data Sync to another computer, or restoring a previously working configuration.
After importing settings:
- Review the imported values.
- Verify the database connection.
- Verify the POSM Media Folder Path.
- Verify the ScanCam Folder Path.
- Click Save.
Database Connection Settings
Database Connection Settings identify the POSM database that Data Sync uses.
Select Database Type
Choose the database type used by the POSM installation:
- Microsoft Access
- SQL
The available connection settings depend on the selected database type.
Microsoft Access DB Path
When using a Microsoft Access POSM database, Microsoft Access DB Path identifies the POSM.mdb file that Data Sync will synchronize.
To select the database:
- Click Browse.
- Navigate to the appropriate POSM application folder.
- Locate
POSM.mdb. - Select the database.
Select the correct POSM database
Data Sync reads local inspection information from the configured POSM database.
Make sure the selected database belongs to the POSM installation you intend to synchronize.
Database Password
Enter a database password when one is required.
Select Show Password to display the entered password.
Exclusive Connection
The Exclusive Connection option is available in Database Connection Settings.
Leave this setting at the configuration recommended for your POSM installation unless instructed otherwise by POSM Support.
Test Connection
Click Test Connection to verify that Data Sync can connect to the configured POSM database.
Test after changing database settings
Use Test Connection whenever you change the database type, database location, password, or related connection settings.
Logging Settings
Data Sync creates activity and exception logs that can be useful for monitoring synchronization and troubleshooting problems.
Exceptions Folder Path
The Exceptions Folder Path determines where Data Sync stores detailed exception and error information.
The default location is the exceptions folder in the Data Sync Tool application folder.
Exception logs may contain information about:
- Missing inspection media folders
- Missing ScanCam files or folders
- Server communication errors
- Other synchronization errors
Use Browse to select a different folder.
Log File Folder Path
The Log File Folder Path determines where Data Sync stores activity and diagnostic log files.
The default location is the logs folder in the Data Sync Tool application folder.
Use Browse to select a different folder.
Log SQL Statements
Select Log SQL Statements when detailed SQL logging is needed.
This normally does not need to be enabled unless additional diagnostic information is required.
Log File Name Suffix
Log File Name Suffix controls the date format appended to Data Sync log filenames.
Available formats include:
yyyy-MMyyyy-Myy-MMyy-MMM-yyyyM-yyyyMM-yyM-yy
The default is:
yyyy-MM
Days to Keep Log Files
Days to Keep Log Files controls how long Data Sync log files are retained.
The default is:
60
Max Activity Log Messages
Max Activity Log Messages controls the configured maximum number of Activity Log messages.
The default is:
200
Logs can help POSM Support
Activity and exception logs can provide useful information when POSM Support is investigating a Data Sync problem.
Session Sync Settings
Session Sync Settings control the POSM Central connection and the local inspection media locations used during synchronization.
Sync to POSM Central
Select Sync to POSM Central to enable synchronization with POSM Central.
The normal Base API URL is:
https://central-api.posmsoftware.com
Do not change the POSM Central API configuration unless instructed by POSM Support.
POSM Media Folder Path
POSM Media Folder Path identifies the location where the configured POSM installation stores inspection video and associated media.
To change the path:
- Click Browse.
- Navigate to the appropriate POSM media folder.
- Select the folder.
The media path must match the POSM installation
An incorrect media path can prevent Data Sync from locating inspection video and other media required during synchronization.
ScanCam Folder Path
ScanCam Folder Path identifies the location of ScanCam data used by the configured POSM installation.
To change the path:
- Click Browse.
- Navigate to the appropriate ScanCam folder.
- Select the folder.
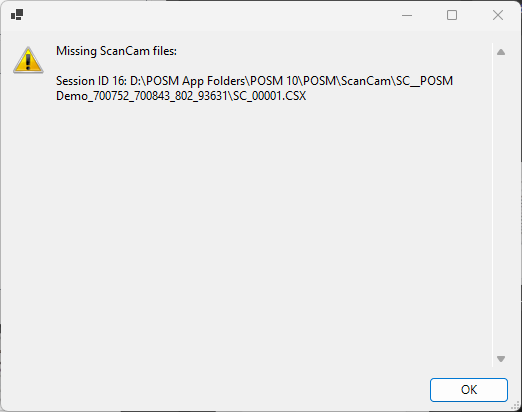
If expected ScanCam files cannot be located, Data Sync may display a warning identifying the affected session and missing file.
Upload Chunk Size
Upload Chunk Size (Bytes) controls the configured upload chunk size used by Data Sync.
The default value is:
5242880
Leave the default value unless POSM Support recommends a different setting.
Save the Configuration
After reviewing or changing the configuration, click Save.
Use Test Connection after changing database connection information.
Data Sync Application Settings
POSM Data Sync stores additional application settings under the current Windows user's Roaming AppData folder:
C:\Users\<username>\AppData\Roaming\PosmDataSync
The Data Sync application itself is installed under the user's Local AppData folder:
C:\Users\<username>\AppData\Local\PosmDataSync
For information about installation, automatic updates, or uninstalling Data Sync, see the installation guide.
Install and Maintain POSM Data Sync
File Menu
After signing in to POSM Data Sync, select File in the upper-left corner of the application to access application-level commands.
The File menu includes:
- Configure AppSettings
- Reconnect
- Re-check Sync Status
- Exit
Configure AppSettings
Select Configure AppSettings to open the App Settings Configuration window.
The configuration window allows you to review or change:
- Database connection
- Logging settings
- POSM Central connection
- POSM media folder
- ScanCam folder
- Other synchronization settings
Reconnect
Select Reconnect when POSM Data Sync needs to reconnect after the connection to POSM Central has been interrupted or needs to be re-established.
Tip
Reconnect can be useful when Data Sync has remained open while the network connection or access to POSM Central has changed.
Re-check Sync Status
Select Re-check Sync Status to have POSM Data Sync check synchronization status again.
Use this when the displayed synchronization status may no longer reflect the current state of the sessions.
Exit
Select Exit to close the POSM Data Sync Tool.
Upload Inspections to POSM Central
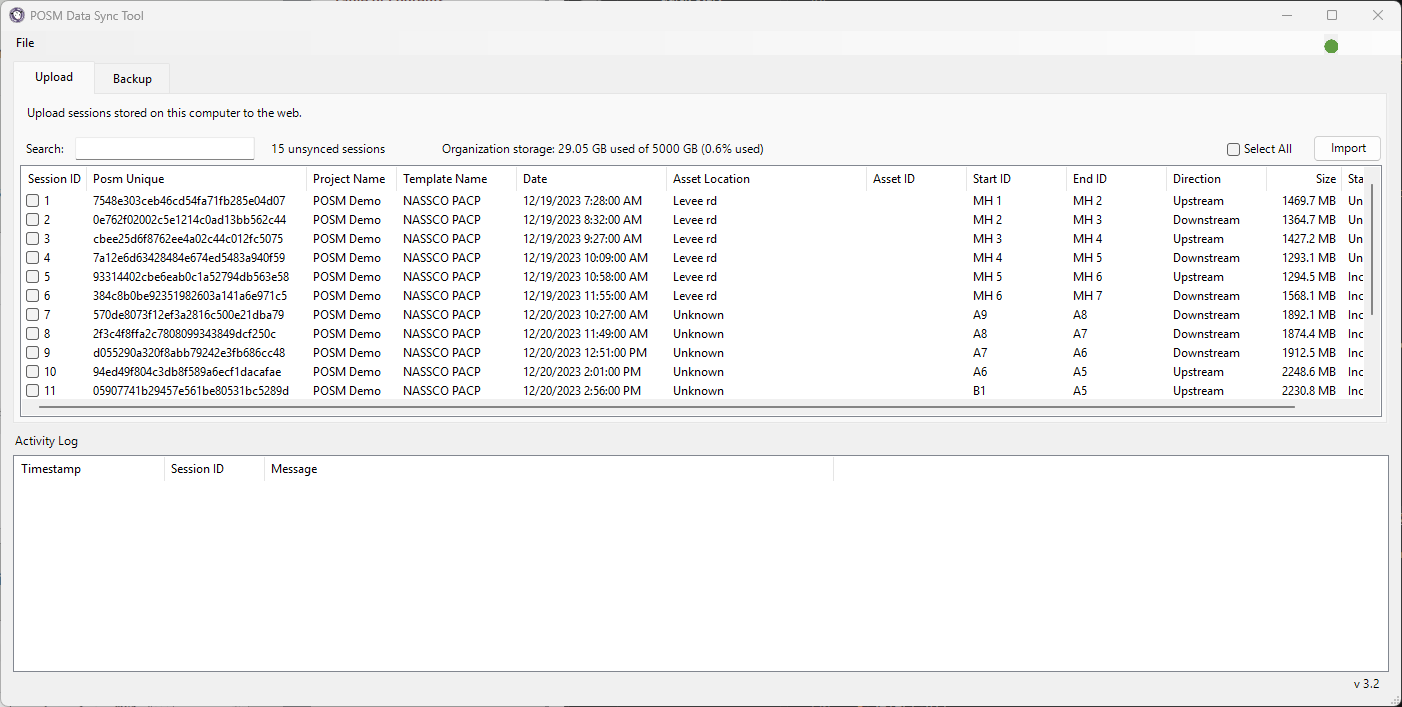
After signing in, Data Sync opens to the Upload tab by default.
The Upload tab sends inspection data from the configured local POSM installation to POSM Central.
Upload direction
Upload moves inspection data from:
Local POSM → POSM Central
The Upload workspace contains two main areas:
- Session List — displays inspections from the configured local POSM database
- Activity Log — displays progress and synchronization messages while inspections are being uploaded
At the top of the Upload tab, Data Sync displays:
- Search
- Number of unsynced sessions
- Organization storage usage
- Select All
- Import
Upload Session List
The session list contains columns including:
- Session ID
- POSM Unique
- Project Name
- Template Name
- Date
- Asset Location
- Asset ID
- Start ID
- End ID
- Direction
- Size
- Status
Use the column headings to sort the displayed sessions.
Use Search to locate inspection data in the list.
Check Organization Storage
The Upload tab displays the organization's current POSM Central storage usage.
Storage is displayed in the following format:
Organization storage: X GB used of X GB (X% used)
For example:
Organization storage: 25 GB used of 5000 GB (0.5% used)
This allows you to check the organization's available Central storage before beginning an upload.
Review available storage before uploading large inspections or a large number of sessions.
If the organization reaches its storage limit, additional inspection data cannot be uploaded until storage capacity is increased.
Select Sessions to Upload
Select the checkbox beside each inspection you want to upload.
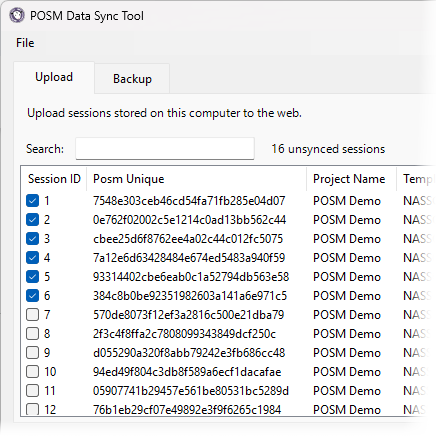
Select a Range of Sessions
To select a consecutive range of sessions, select the first checkbox, then hold Shift and select the last checkbox in the desired range.
Data Sync automatically selects all sessions between the first and last selections.
To select all available sessions, select Select All.
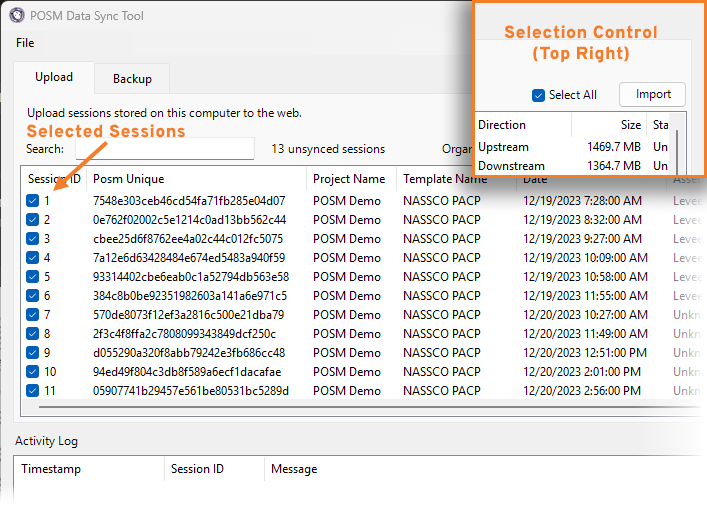
After selecting the desired sessions, click Import.
Import uploads inspections to Central
Although the action button is labeled Import, this operation uploads the selected local POSM inspections to POSM Central.
Monitor the Upload
After clicking Import, Data Sync begins processing the selected inspections.
The Activity Log at the bottom of the window displays the progress of the operation.
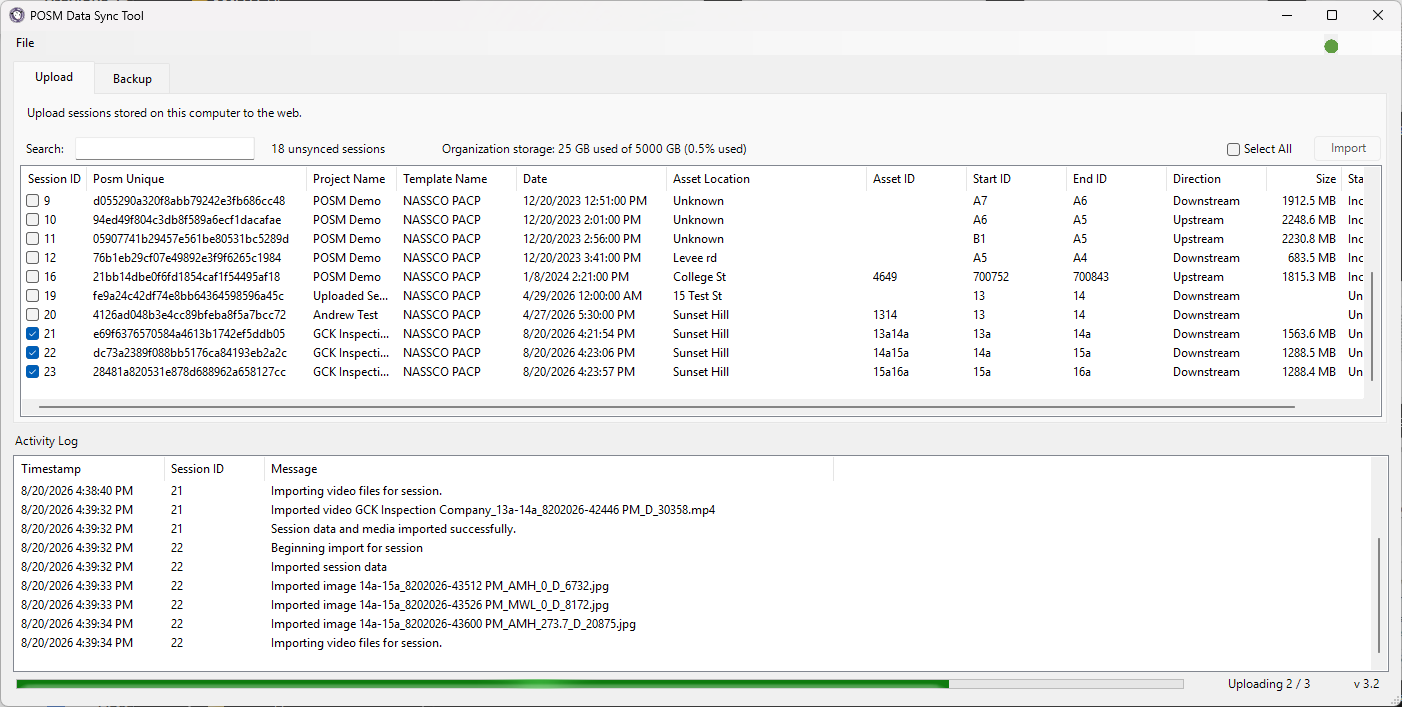
The Activity Log contains:
- Timestamp
- Session ID
- Message
During an upload, messages may show:
- Beginning import for a session
- Session data imported
- Individual images imported
- Video import started
- Video files imported
- Session data and media imported successfully
A progress bar at the bottom of the application shows the overall upload progress.
The lower-right corner shows which selected inspection is currently being processed, such as:
Uploading 2 / 3
Watch the Activity Log
The Activity Log provides detailed feedback while Data Sync is uploading inspection data.
If an inspection does not upload completely, the Activity Log can help identify the affected session and where the process stopped.
Successful Upload
When Data Sync finishes processing the selected inspections, a confirmation appears.
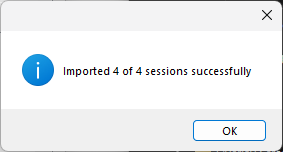
The confirmation identifies how many of the selected sessions were imported successfully.
Back Up Inspections From POSM Central
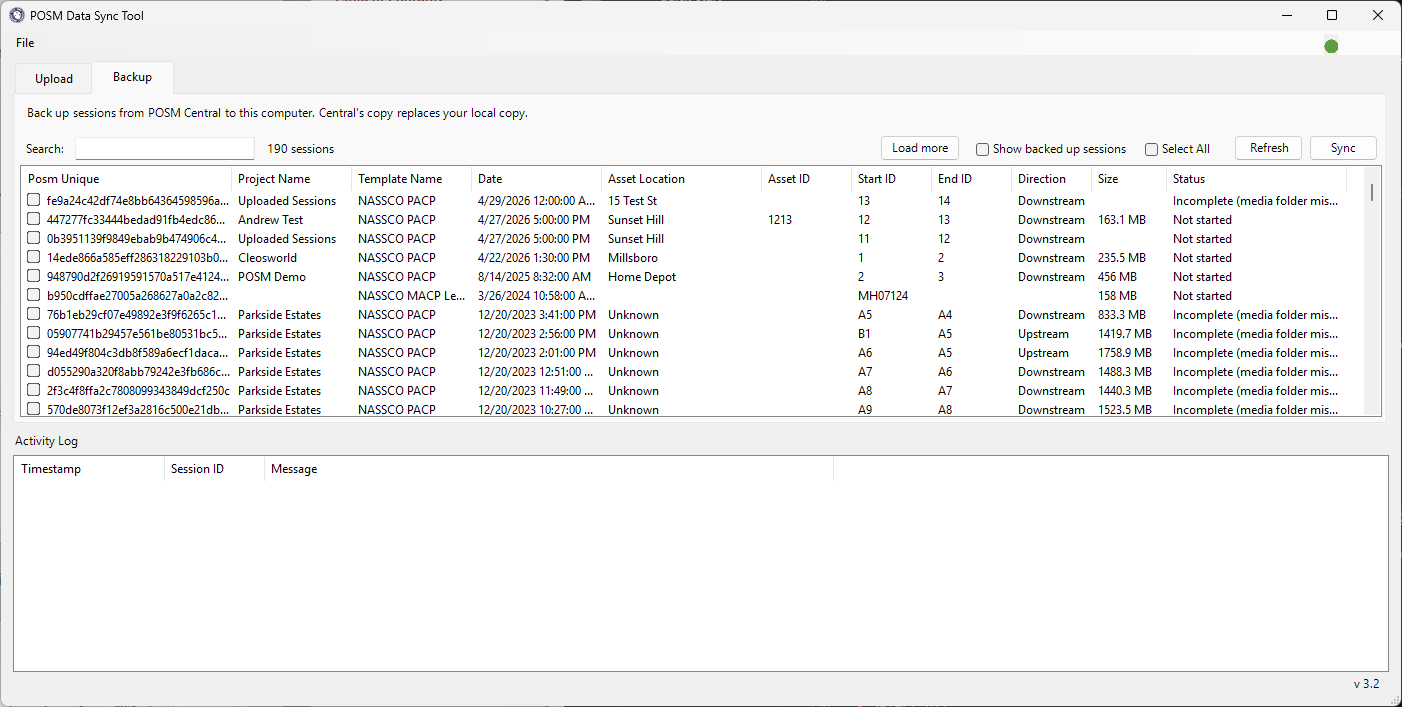
Select the Backup tab to download inspection data from POSM Central into the configured local POSM installation.
Backup direction
Backup moves inspection data from:
POSM Central → Local POSM
The Backup workspace contains two main areas:
- Session List — displays inspection data available from POSM Central
- Activity Log — displays progress while inspections are downloaded and written to the local POSM installation
At the top of the Backup tab, Data Sync provides:
- Search
- Number of available Central sessions
- Load More
- Show backed up sessions
- Select All
- Refresh
- Sync
Backup Session List
The Backup session list contains columns including:
- POSM Unique
- Project Name
- Template Name
- Date
- Asset Location
- Asset ID
- Start ID
- End ID
- Direction
- Size
- Status
Use Search to locate inspections.
Use the column headings to sort the displayed information.
Load More Sessions
Click Load More to retrieve additional POSM Central sessions and add them to the displayed list.
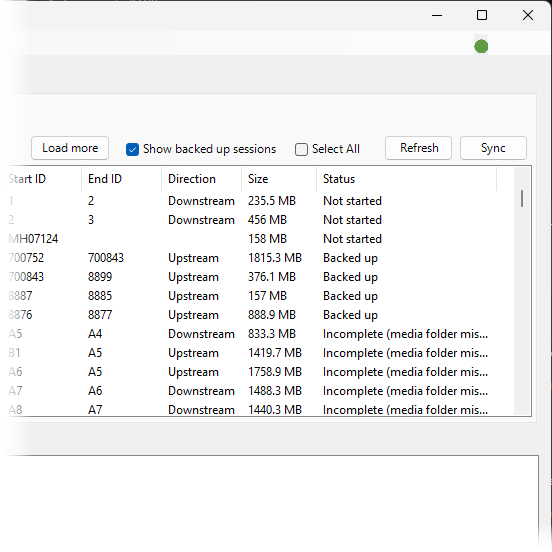
Show Backed Up Sessions
Select Show backed up sessions when you want the list to include inspections that have already been backed up to the local POSM installation.
Refresh the Session List
Click Refresh to retrieve updated inspection information from POSM Central.
Select Sessions for Backup
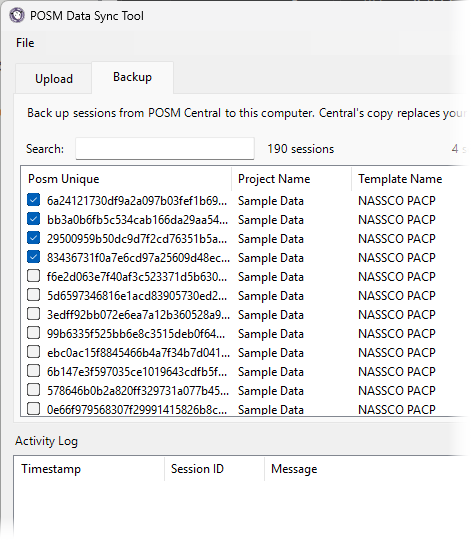
Select the checkbox beside each inspection you want to download to the local POSM installation.
Select a Range of Sessions
To select a consecutive range of sessions, select the first checkbox, then hold Shift and select the last checkbox in the desired range.
Data Sync automatically selects all sessions between the first and last selections.
To select all currently available sessions, select Select All.
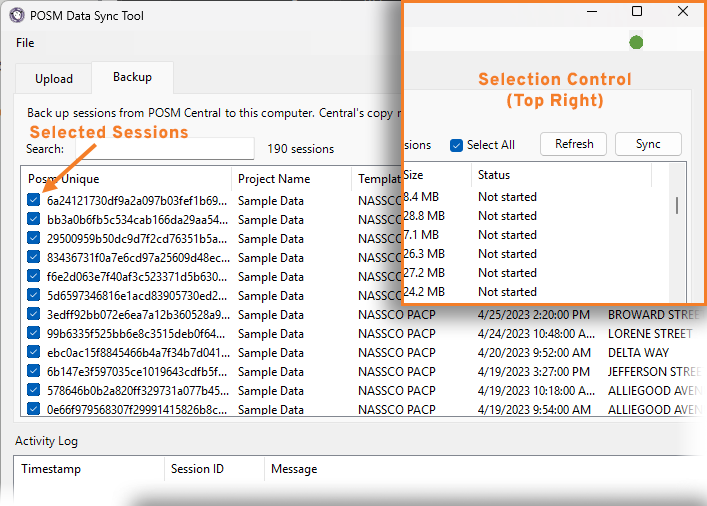
After selecting the desired inspections, click Sync.
Sync downloads inspections from Central
On the Backup tab, Sync retrieves the selected inspection data from POSM Central and writes it to the configured local POSM installation.
Monitor the Backup
After clicking Sync, Data Sync begins retrieving the selected inspections from POSM Central.
The Activity Log at the bottom of the application displays the progress of the operation.
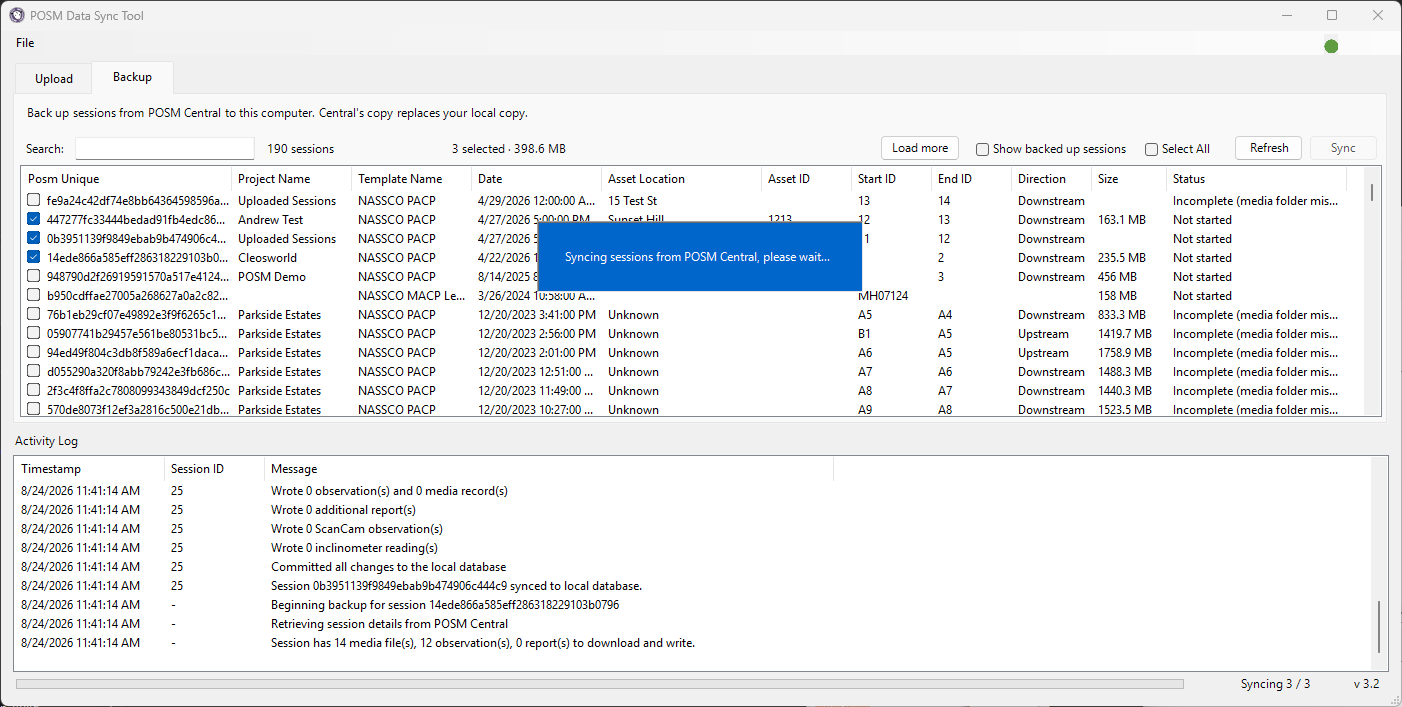
During a backup, messages may show:
- Beginning backup for a session
- Retrieving session details from POSM Central
- Number of media files and observations to download
- Media files downloaded
- Writing session information to the local database
- Writing observations and media records
- Writing additional reports
- Writing ScanCam observations, when present
- Writing inclinometer readings, when present
- Committing changes to the local database
- Session synchronized to the local database
While synchronization is running, Data Sync may display:
Syncing sessions from POSM Central, please wait...
The lower-right corner shows which selected inspection is currently being processed, such as:
Syncing 3 / 3
Watch the Activity Log
The Activity Log provides detailed feedback while Data Sync retrieves inspection data from POSM Central and writes it to the local POSM installation.
If a backup does not complete, the Activity Log can help identify the affected inspection and where the process stopped.
Successful Backup
When Data Sync finishes processing the selected inspections, a confirmation appears.
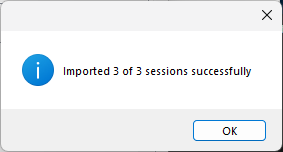
The confirmation identifies how many of the selected sessions were backed up successfully.
Data Sync Status
The Status column provides information about the synchronization state of each inspection.
Depending on the tab and inspection, statuses may include:
| Status | Where Seen | Meaning |
|---|---|---|
| Unsynced | Upload | The local inspection has not been completely synchronized to POSM Central |
| Incomplete | Upload or Backup | Synchronization did not complete |
| Not started | Backup | The Central inspection has not been backed up to the local POSM installation |
| Backed up | Backup | The Central inspection has been synchronized to the local POSM installation |
Missing Files and Synchronization Errors
Data Sync relies on the configured POSM database, media folders, ScanCam folder, and valid inspection information.
Synchronization problems can occur when:
- Inspection media folders are missing
- Expected ScanCam files are missing
- Configured media paths are incorrect
- NASSCO inspection data contains validation errors
- Data Sync encounters a server or communication error
If expected files are missing, Data Sync may identify the affected Session ID and the missing file or folder.
Review the Activity Log and exception logs for additional information.
Data Sync Logs
Data Sync maintains activity and exception logs that provide additional information about synchronization operations.
The configured log locations are available under Configure AppSettings → Logging Settings.
Logs can help identify:
- Which session was being processed
- What operation was being performed
- Missing media or ScanCam data
- Synchronization errors
- Server or communication errors
POSM Support can help investigate Data Sync problems
You do not need to diagnose a Data Sync problem before contacting POSM Support.
The Activity Log, exception logs, affected Session ID, and Data Sync version can help the Support team investigate the issue with you.
The installed Data Sync Tool version appears in the lower-right corner of the application.