POSM Central GIS
POSM Central GIS provides an interactive web map for viewing customer GIS data together with POSM inspection information.
POSM Central GIS is currently a separate web application with its own sign-in process. POSM configures the GIS site and map access for each customer.
POSM Central provides a convenient link to the GIS application. Select Go To GIS from the POSM Central left navigation menu to open POSM Central GIS.
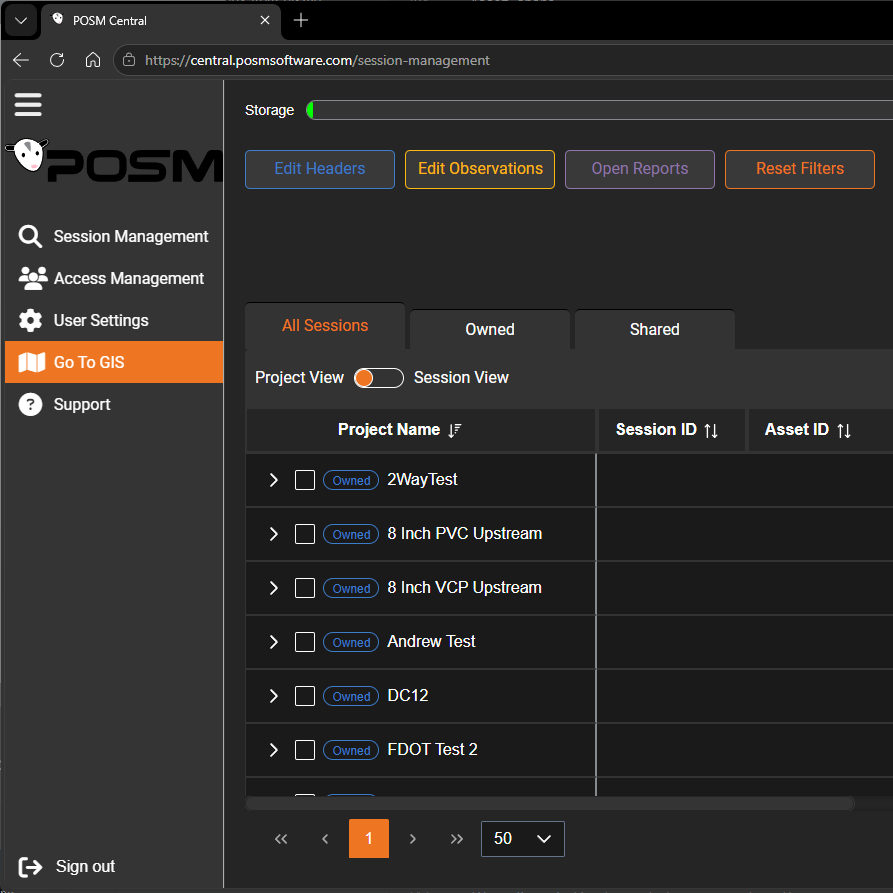
POSM Central GIS uses a separate login
POSM Central and POSM Central GIS currently use separate sign-in systems.
Selecting Go To GIS opens the POSM Central GIS website. Sign in using your POSM Central GIS credentials to access the GIS workspaces assigned to your account.
GIS Workspace
The GIS workspace displays the organization's configured GIS layers and related asset information on an interactive map.
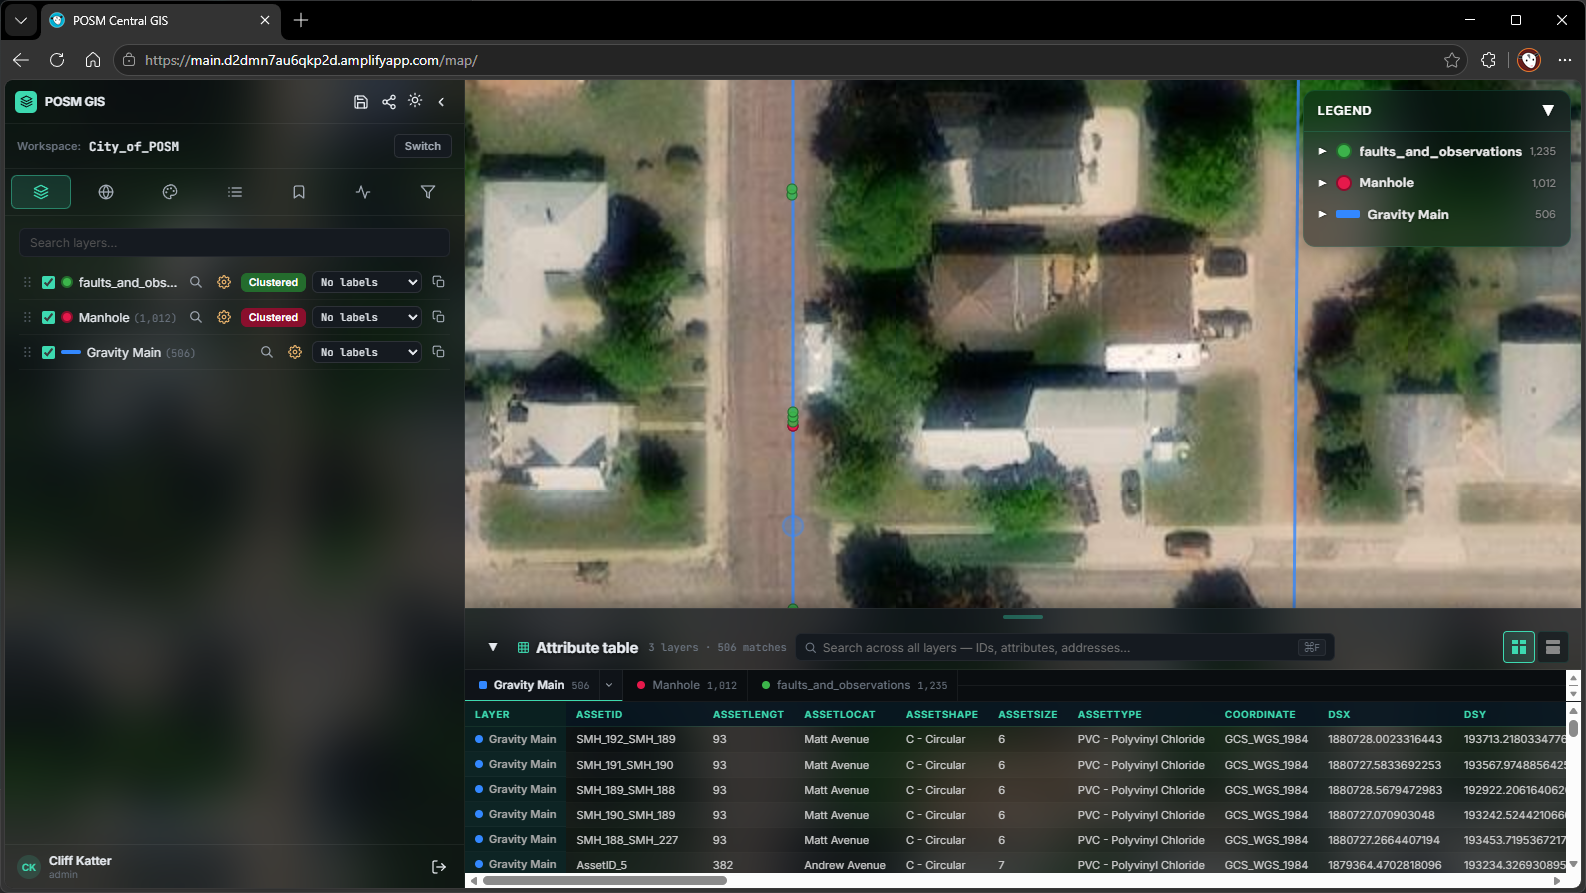
The workspace includes:
- Interactive map
- Layers
- Basemaps
- Symbology
- Legend
- Bookmarks
- Work Orders
- Advanced Search
- Attribute Table
- Feature information
- Links to associated POSM inspection reports
- Map sharing and saved map settings
GIS data varies by organization
The layers, fields, asset information, symbology, and other GIS features available depend on the organization's GIS configuration.
POSM Central and POSM Central GIS accounts
POSM Central and POSM Central GIS currently use separate sign-in systems.
Access to POSM Central does not automatically provide access to POSM Central GIS. If GIS access is needed, contact POSM Support.
Workspaces
A GIS workspace represents a configured GIS map and its associated data.
After signing in to POSM Central GIS, users with access to multiple workspaces can select the workspace they want to open.
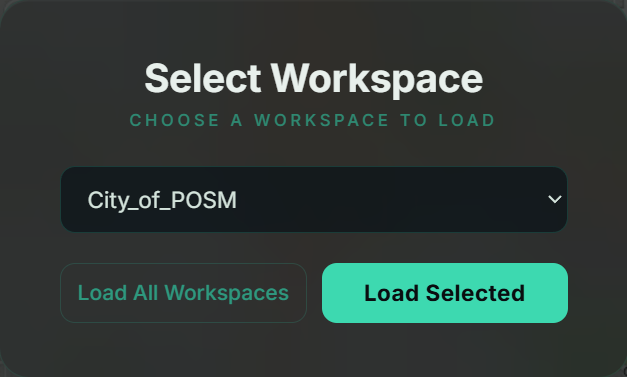
Organizations may use workspaces differently depending on how they use POSM Central GIS.
For example:
- A city may normally have a single workspace containing its GIS map and data.
- A contractor may have access to multiple workspaces when working with GIS data for different cities or customers.
If your account has access to only one workspace, POSM Central GIS may load that workspace automatically.
Current Workspace
After a workspace is opened, its name appears at the top of the left panel beside Workspace.
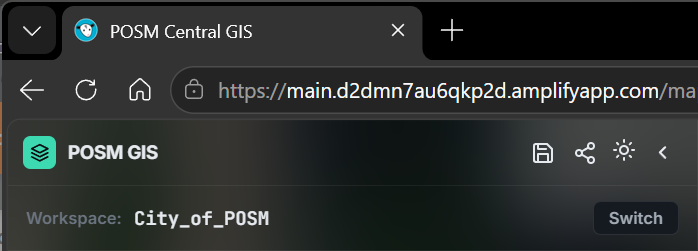
The current workspace name and Switch button remain visible above the GIS tool tabs. This makes it easy to confirm which GIS workspace you are currently viewing while using Layers, Basemaps, Symbology, Legend, Bookmarks, Work Orders, or Advanced Search.
Switch Workspaces
If your account has access to another workspace, select Switch beside the current workspace name.
The workspace selector opens again.
- Select Switch.
- Choose the workspace you want to open.
- POSM Central GIS loads the selected workspace and its configured GIS data.
Check the current workspace
If your account has access to GIS data for multiple cities or customers, check the Workspace name before searching, reviewing assets, or creating Work Orders.
Note
Workspace availability depends on the user's POSM Central GIS account and GIS configuration.
Current Workspace
After a workspace is opened, its name appears at the top of the left panel beside Workspace.
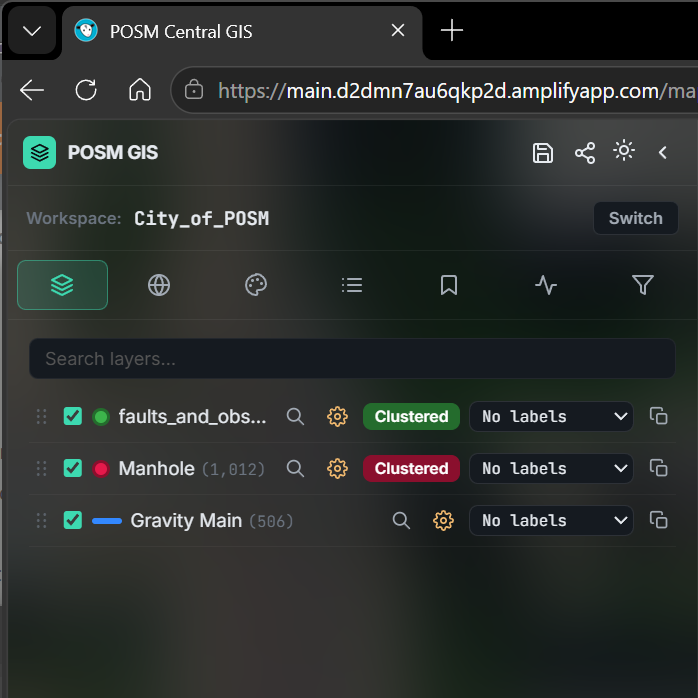
The workspace name and Switch button remain available above the GIS tool tabs, including:
- Layers
- Basemaps
- Symbology
- Legend
- Bookmarks
- Work Orders
- Advanced Search
This makes it easy to confirm which GIS workspace you are currently viewing while using any of the GIS tools.
Switch Workspaces
If your account has access to another workspace, select Switch beside the current workspace name.
The workspace selector opens again.
- Select Switch.
- Choose the workspace you want to open.
- POSM Central GIS loads the selected workspace and its configured GIS data.
Check the current workspace
If your account has access to GIS data for multiple cities or customers, check the Workspace name before searching, reviewing assets, or creating Work Orders.
Note
Workspace availability depends on the user's POSM Central GIS account and GIS configuration.
Switch Workspaces
When more than one workspace is available, use Switch to change to another available workspace.
The map reloads using the GIS layers and information associated with the selected workspace.
Note
Workspace availability depends on the user's POSM Central GIS account and the GIS configuration.
Map Controls
The left panel provides access to seven primary GIS areas:
- Layers
- Basemaps
- Symbology
- Legend
- Bookmarks
- Work Orders
- Advanced Search
Select the appropriate icon at the top of the left panel to switch between these functions.
The panel can also be collapsed when additional map viewing space is needed.
Navigate the Map
Use the map to move through the organization's GIS network.
You can:
- Pan by dragging the map
- Zoom in or out
- Change the basemap
- Turn GIS layers on or off
- Search for assets
- Click mapped features to view their information
- Save frequently used map views as Bookmarks
Layers
The Layers tab controls which GIS layers are displayed and how the layers are organized on the map.
Depending on the organization's GIS configuration, layers may include:
- Gravity mains
- Manholes
- Faults and observations
- Other customer GIS data
The available layers and their contents depend on the GIS data configured for the organization.
Show or Hide a Layer
Use the checkbox beside a layer to turn that layer on or off.
Turning a layer off removes it from the map display without removing its underlying GIS data.
Reorder Layers
Use the drag handle at the left side of a layer to move it to a different position in the Layers list.
Changing the layer order changes the order in which the layers are drawn on the map.
The Layers panel above shows the drag handles beside each available layer.
Zoom to a Layer
Select the magnifier beside a layer to zoom the map to the extent of that layer.
This is useful when you want to quickly locate the features contained in a particular GIS layer.
Layer Settings
Select the settings control beside a layer to open its Layer Settings.
Layer Settings can identify which GIS fields are used for information such as:
- Asset ID
- Start ID
- End ID
- Address or geocoding information
These mappings help POSM Central GIS identify assets consistently.
They are particularly important when GIS features are used with Work Orders.
SCREENSHOT NEEDED: Layer Settings window showing Asset ID, Start ID, End ID, and address/geocoding fields.
Point Clustering
Applicable point layers can use clustering.
Clustering groups nearby map points together when many features are displayed in a small area.
The Layers panel displays Clustered when clustering is enabled for an applicable layer.
As you zoom in, clusters separate to show individual features.
Feature Labels
Applicable layers can display labels using information stored in a GIS attribute field.
Use the label drop-down beside the layer to select the field you want displayed on the map.
Select No Labels when labels are not needed.
The available label fields depend on the data stored in the GIS layer.
Duplicate a Layer
Use the duplicate control at the right side of an applicable layer when you want another map representation of the same underlying GIS data.
The duplicated layer can be configured independently, allowing the same data to be displayed using different map settings or symbology.
Basemaps
The Basemaps tab changes the background map displayed beneath the organization's GIS layers.
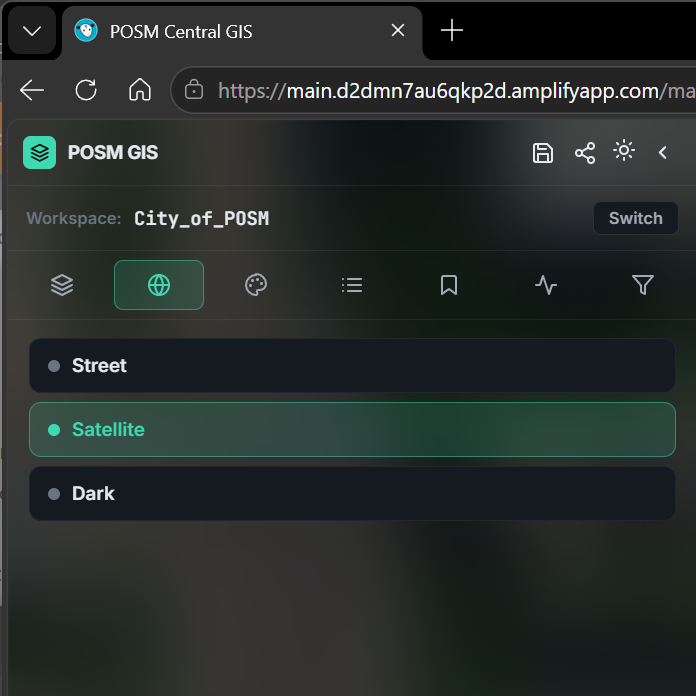
Available basemap options include:
- Street
- Satellite
- Dark
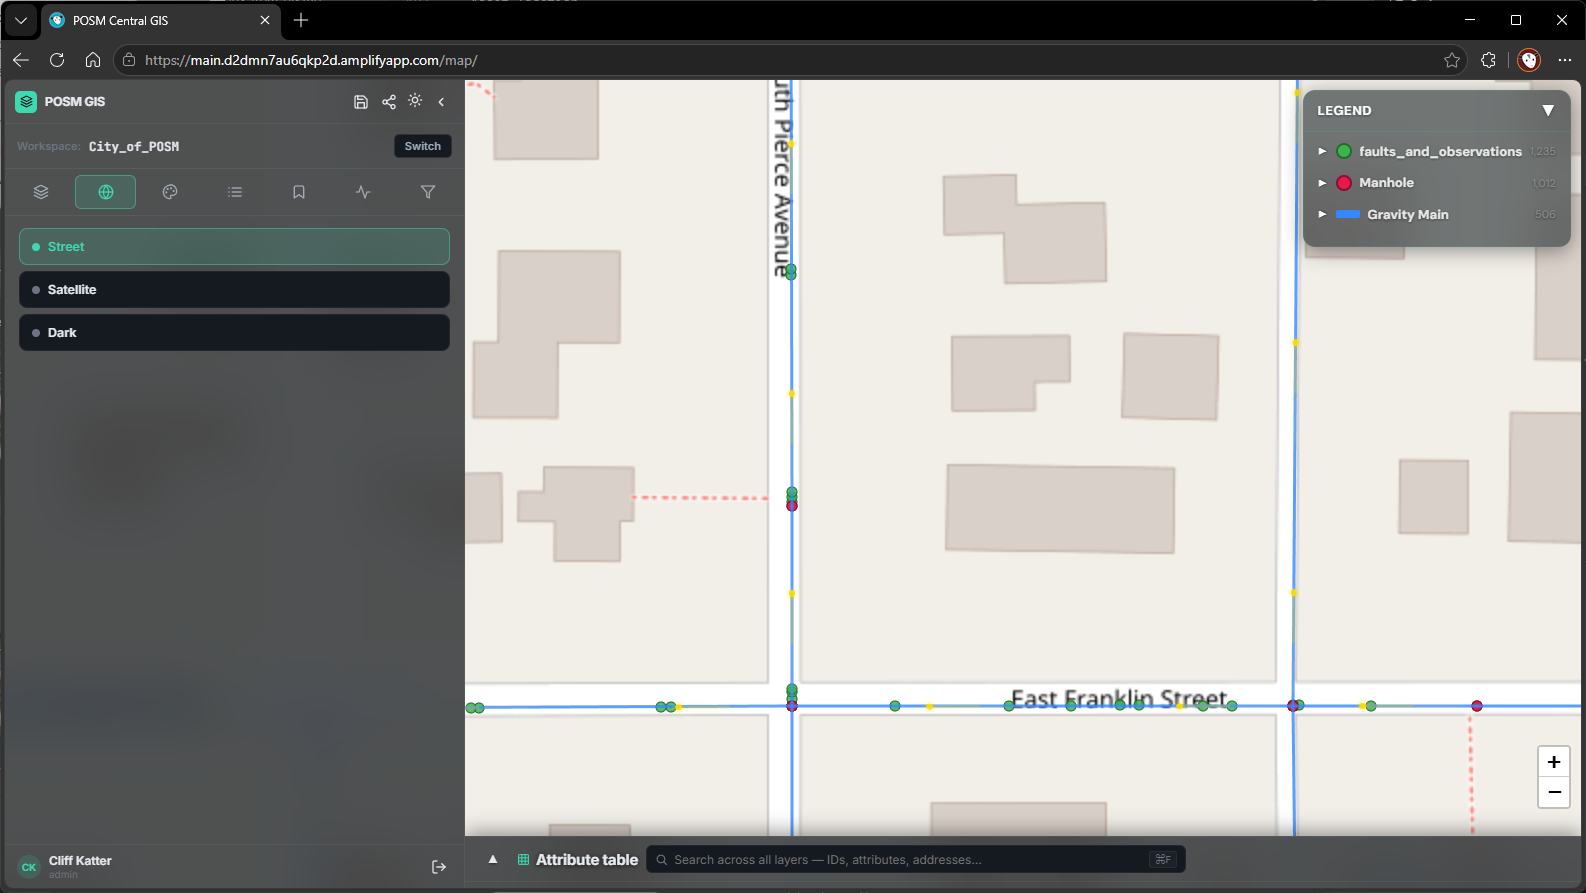
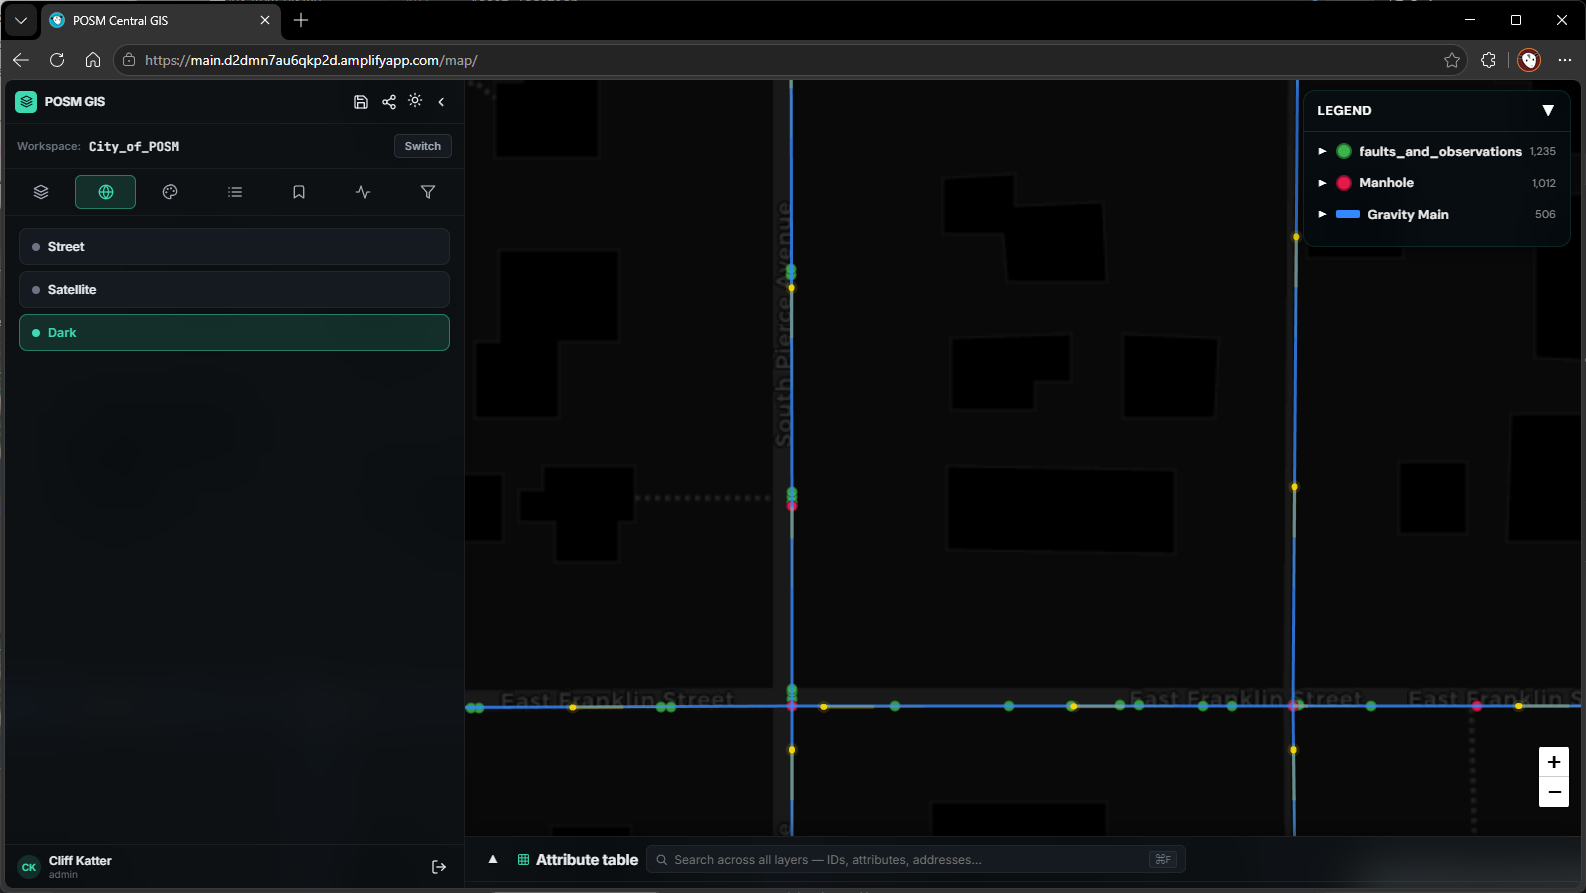
Changing the basemap changes the background map but does not change the organization's GIS asset data.
Satellite View
Street View
Dark View
Interface Theme
The GIS interface can also provide light and dark display themes.
The interface theme is separate from the selected basemap.
For example, the Street basemap can be used with either the light or dark GIS interface.
SCREENSHOT NEEDED: Light GIS interface showing the theme control.
Symbology
The Symbology tab controls how GIS information is visually displayed.
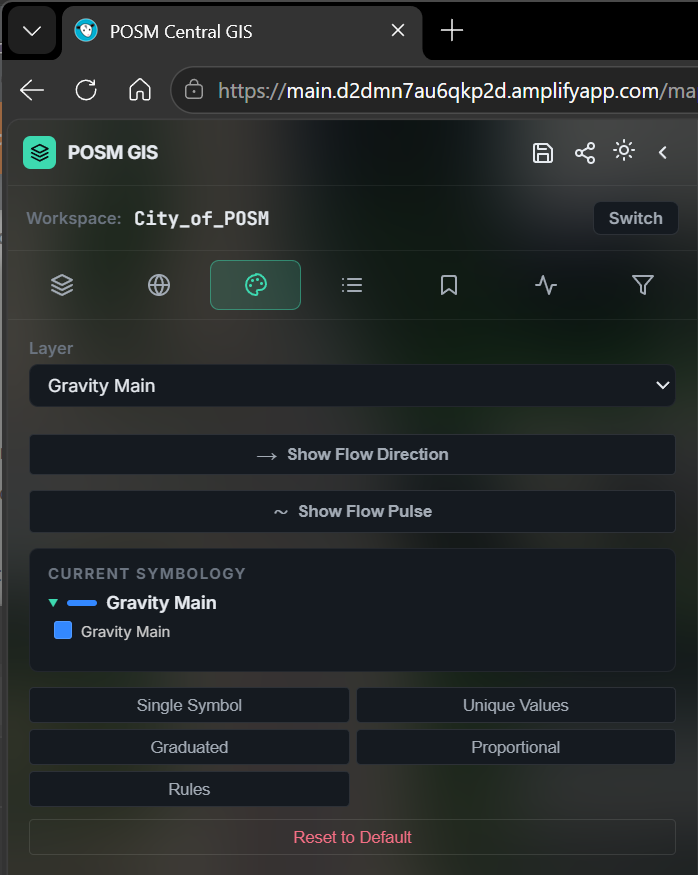
Select the layer you want to configure.
Depending on the selected layer, available symbology options may include:
- Single Symbol
- Unique Values
- Graduated
- Proportional
- Rules
- Show Flow Direction
- Show Flow Pulse
- Reset to Default
Single Symbol
Use Single Symbol when all features in a layer should use the same basic symbol or appearance.
Unique Values
Use Unique Values to display different categories using different symbols or colors.
For example, a layer could be displayed according to:
- Rating
- Fault type
- Pipe material
- Asset type
- Another available GIS attribute
Graduated
Use Graduated symbology to display numeric information across a range.
This can be useful for visualizing information such as condition or rating values.
Proportional
Use Proportional symbology when the displayed symbol size should change according to a numeric GIS value.
Rules
Use Rules when more specific conditions are needed to control how GIS features are displayed.
Flow Direction
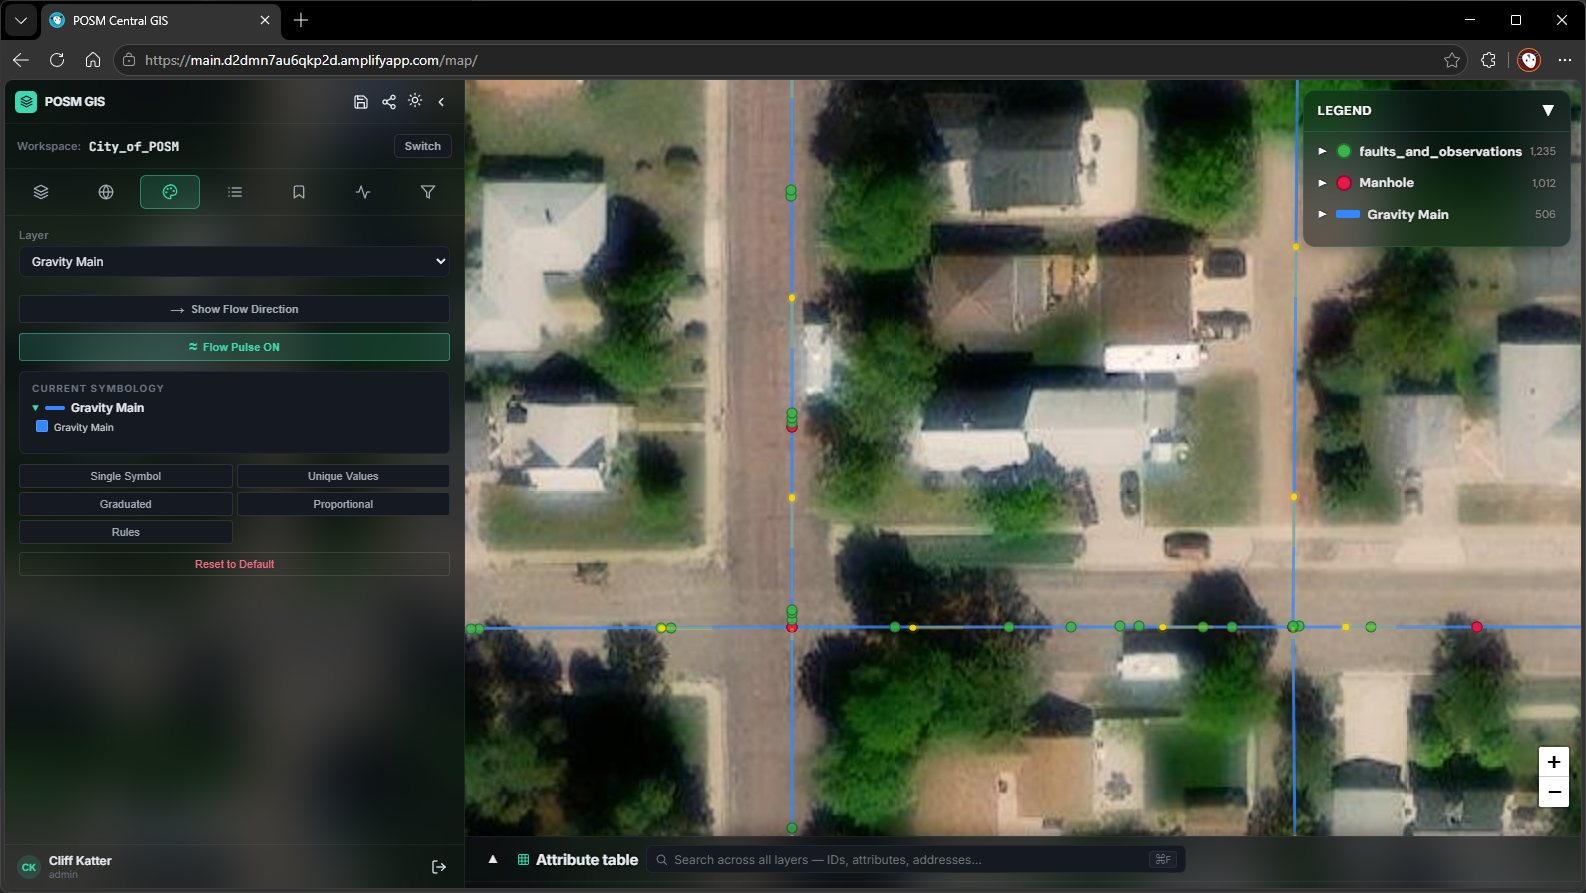
Use Show Flow Direction to display directional arrows along applicable pipe layers.
The arrows provide a visual indication of the direction of flow through the pipe network.
Flow Pulse
Use Show Flow Pulse to provide an animated indication of flow direction.
When enabled, indicators move along applicable pipes to make the direction of flow easier to visualize.
Reset Symbology
Use Reset to Default to return the selected layer to its configured default symbology.
Legend
A collapsible Legend appears in the upper-right corner of the map.
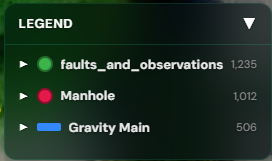
The map Legend identifies the GIS layers represented on the map and the symbols associated with them.
The number shown beside a layer indicates the number of features represented for that layer.
Use the arrow beside a layer to expand or collapse its legend information.
The entire Legend can also be collapsed when more map viewing space is needed.
Legend Panel
The Legend tab in the left panel provides a more detailed view of the symbols and classifications used by the GIS layers.
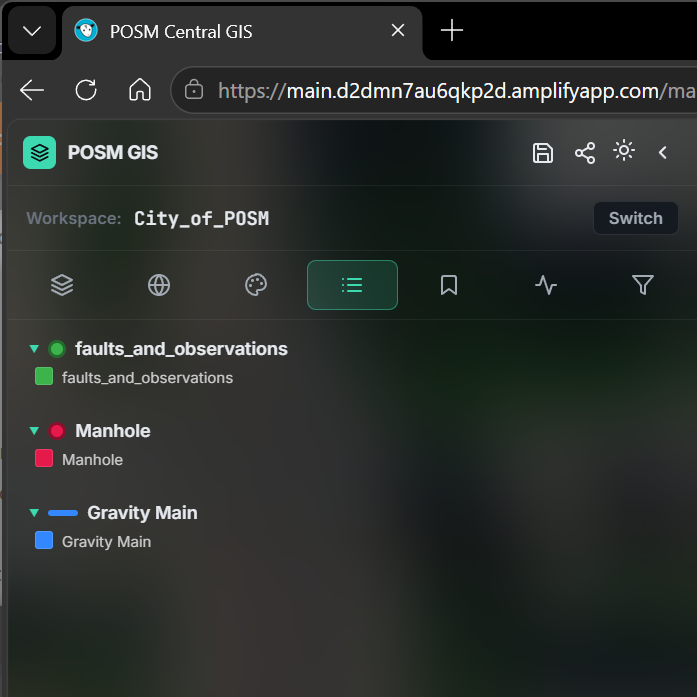
For layers using categorized symbology, the Legend can identify what each displayed color or symbol represents.
Two legend views
The floating Legend in the upper-right corner provides a quick map reference.
The Legend tab in the left panel provides access to the layer legend information from the GIS controls.
Search and Attribute Data
POSM Central GIS provides both a searchable Attribute Table and an Advanced Search tool.
Use the Attribute Table for quick searches and browsing GIS records.
Use Advanced Search when you need to build more specific search conditions.
Attribute Table
The Attribute Table appears along the bottom of the GIS workspace.
It displays GIS records and their associated attributes.
The table can contain information such as:
- Layer
- Asset ID
- Asset length
- Asset location
- Asset shape
- Asset size
- Asset type
- Coordinate information
- Other fields stored in the GIS layer
The exact columns depend on the organization's GIS data.
Search GIS Data
Use the search field in the Attribute Table to quickly locate GIS information.
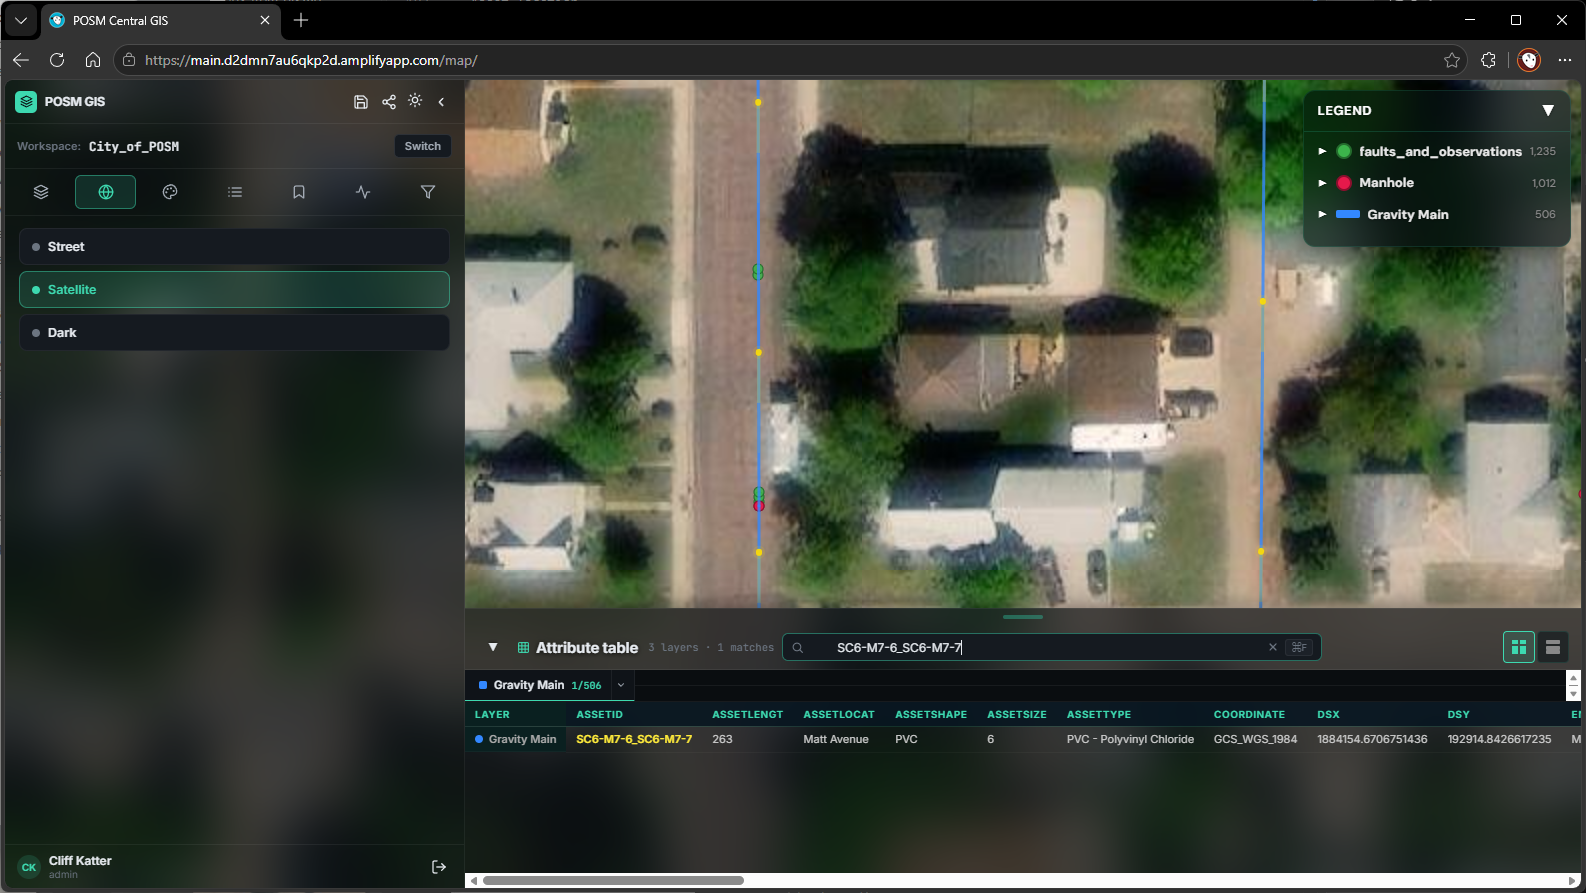
Enter an ID, attribute, address, or other available value in the search field.
As the search is applied, the Attribute Table displays matching records.
The number of matches is displayed above the table.
Use the Attribute Table for quick searches
The Attribute Table search is useful when you already know an Asset ID, address, or other identifying information and want to quickly locate the corresponding GIS record.
Expand the Attribute Table
Expand the Attribute Table when you want to browse the matching GIS records in more detail.
The expanded table can provide:
- A tab for each GIS layer
- Match counts for each layer
- Individual feature records
- Card or grid-style views
- Map highlighting for the displayed results
Features represented in the table are highlighted on the map, allowing you to see where the matching assets are located.
SCREENSHOT NEEDED: Expanded Attribute Table showing layer tabs, results, and highlighted map features.
Advanced Search
Use Advanced Search to create detailed searches using attributes stored in the organization's GIS layers.
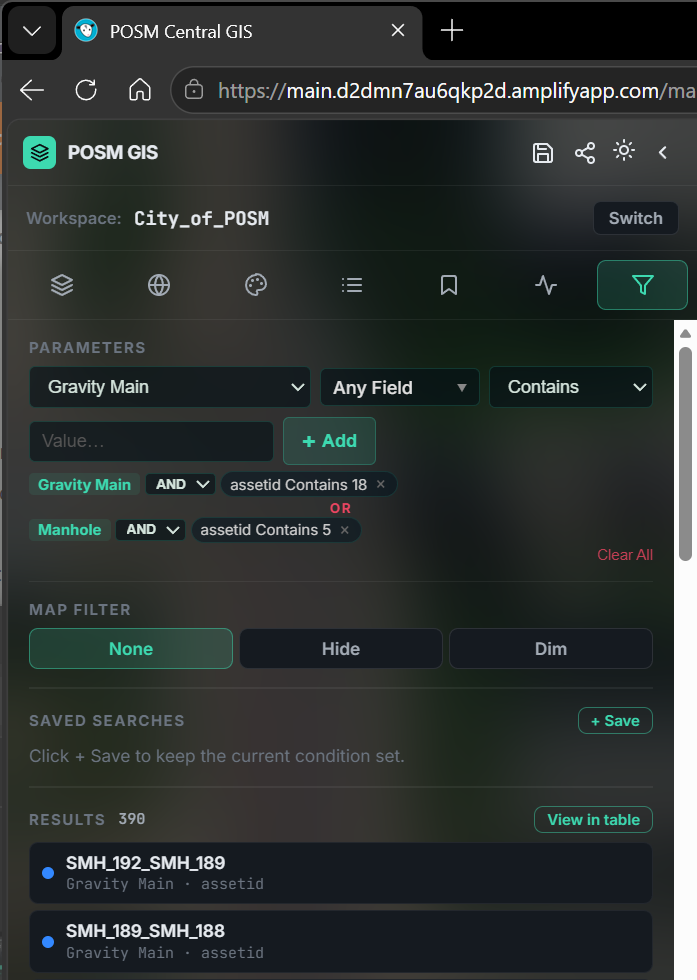
Advanced Search can combine multiple conditions to locate a specific group of GIS features.
The Advanced Search panel also provides access to:
- Map filtering
- Saved searches
- Search results
- View in table
Available search fields depend on your GIS data
The layers and fields available in Advanced Search depend on the data configured for the organization's GIS workspace.
Different organizations may have different searchable fields.
Create a Search Condition
The Parameters area defines each search condition.
A condition can include:
- Layer
- Field
- Comparison
- Value
Click Add to add the condition to the search.
Select a Layer
The first drop-down selects the GIS layer to search.
Example layers may include:
- Gravity Main
- Manhole
- Faults and Observations
The available layers depend on the organization's GIS configuration.
Select a Field
The next drop-down selects the GIS attribute to search.
Select Any Field to search without limiting the condition to one specific field.
Depending on the organization's GIS data, searchable fields may include:
- Asset ID
- Asset length
- Asset location
- Asset shape
- Asset size
- Asset type
- Coordinates
- Start ID
- End ID
- Last inspection
- Maintenance information
- Overall rating
- Pipe use
- Structural information
- Other GIS fields
This is not a fixed list. Advanced Search uses the fields available in the organization's GIS data.
Select a Comparison
Available comparisons include:
- Contains
- Equals
- Not Equal
- Greater Than
- Less Than
- ≥ — Greater Than or Equal To
- ≤ — Less Than or Equal To
- Between
- Is Null
- Is Not Null
The appropriate comparison depends on the type of information being searched.
Enter a Value
Enter the value you want to search for in the Value field.
Some comparisons, such as Is Null and Is Not Null, do not require a value.
Click Add to add the condition to the search.
Combine Search Conditions
Additional conditions can be added to create more specific searches.
Conditions can combine different:
- Layers
- Fields
- Comparisons
- Values
The Advanced Search panel displays the active conditions together, making it possible to build searches across multiple layers and fields.
Use Clear All when you want to remove the current search conditions and begin again.
Map Filter
Advanced Search provides options for controlling how non-matching features are displayed:
- None
- Hide
- Dim
None leaves the map display unchanged.
Hide removes non-matching features from the map display.
Dim keeps non-matching features visible but reduces their visual prominence so matching features are easier to identify.
Saved Searches
Frequently used Advanced Searches can be saved for later use.
After creating the desired condition set, select + Save in the Saved Searches area.
Saved searches allow the same search conditions to be used again without rebuilding the search each time.
Search Results
Features matching the Advanced Search conditions appear in the Results area.
The Results area displays the number of matching features and provides access to the individual results.
Select View in table to review the matching records in the Attribute Table.
View GIS Asset Information
Click a feature on the map to open its information window.
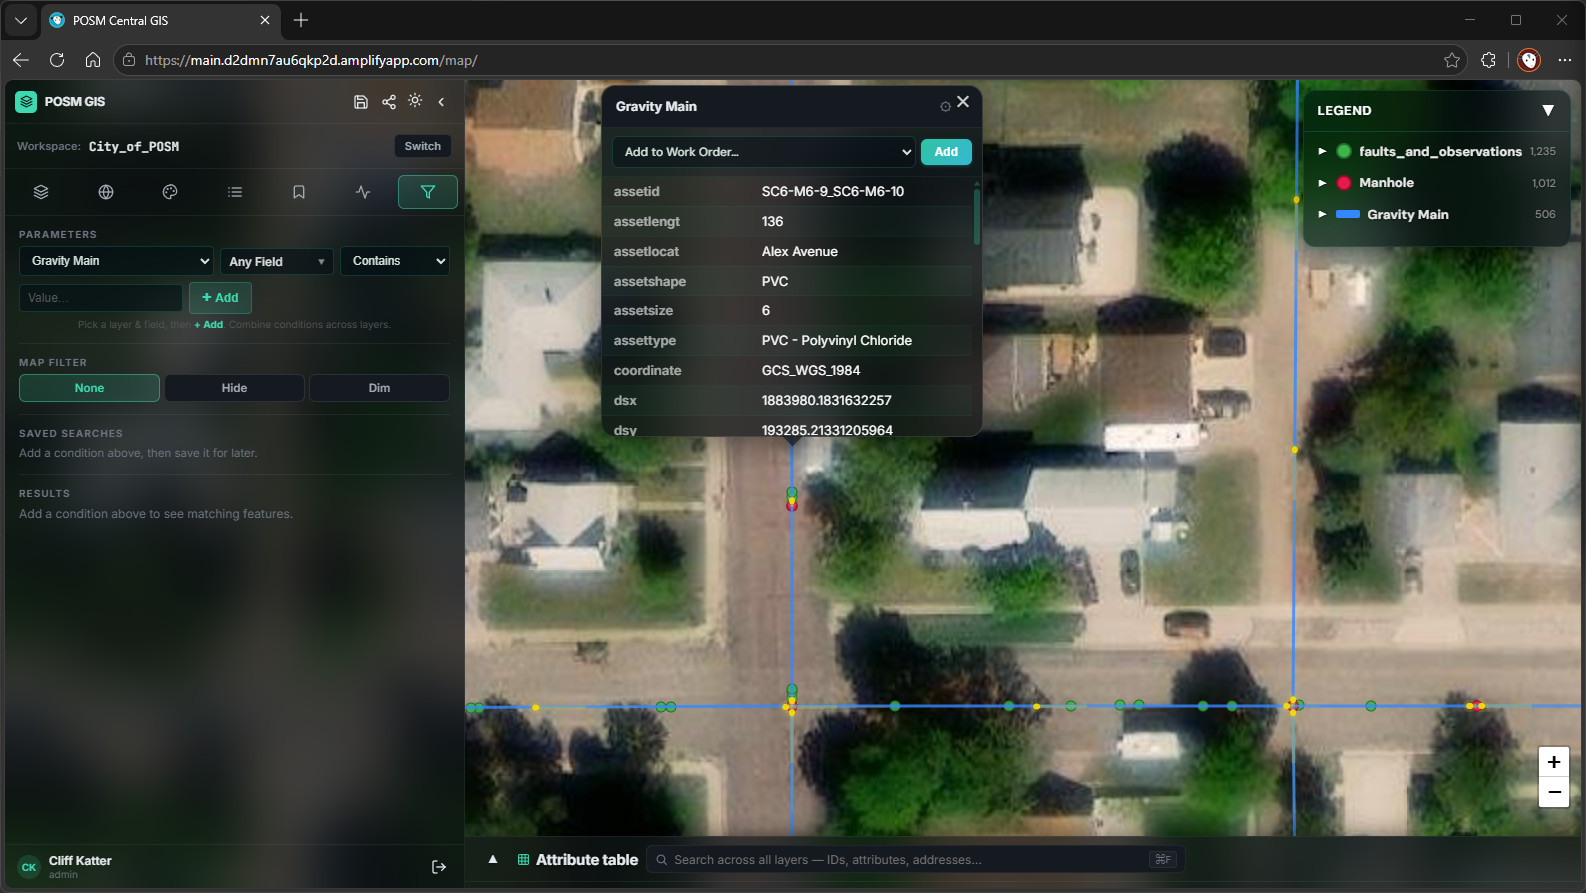
The window displays the GIS attributes stored for the selected feature.
Depending on the layer and the organization's GIS data, information may include:
- Asset ID
- Asset length
- Asset location
- Asset shape
- Asset size
- Asset type
- Coordinate information
- Start and end information
- Other GIS attributes
The exact fields displayed depend on the data stored in the selected GIS layer.
Add an Asset to a Work Order
When available, the asset information window includes an Add to Work Order control.
Use this control to add the selected GIS feature to a work order without leaving the map.
SCREENSHOT NEEDED: GIS feature popup showing Add to Work Order.
Open an Inspection Report From GIS
When a mapped GIS asset is associated with POSM inspection information, the asset information window may contain a report_link.
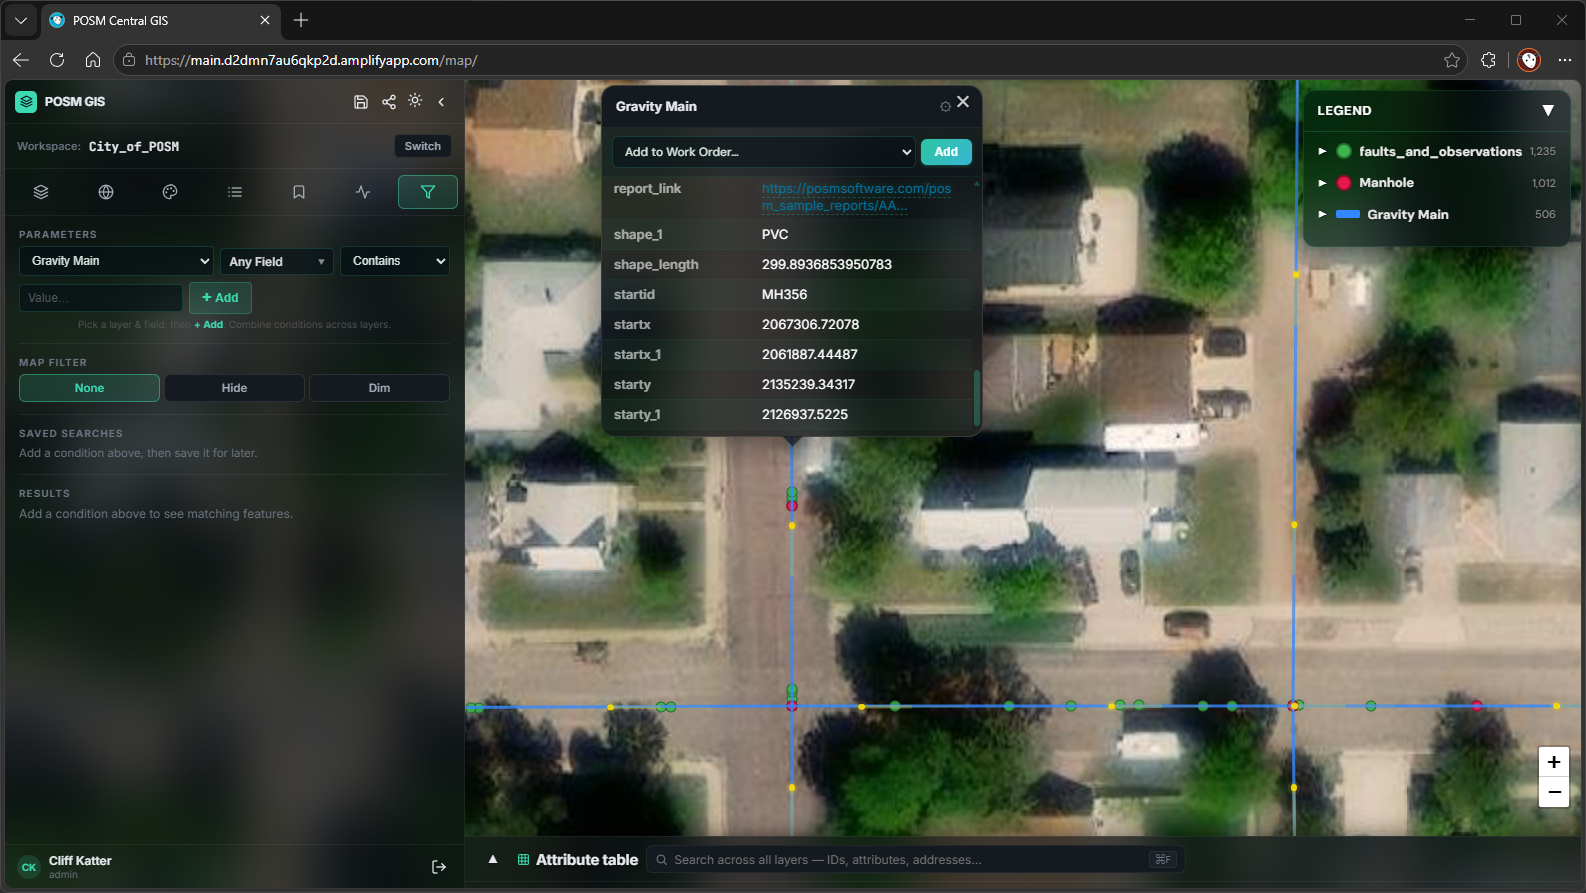
Click the report link to open the inspection reports associated with the mapped asset.
This allows someone working in GIS to move directly from a mapped asset to its inspection information without manually locating the inspection in Session Management.
Bookmarks
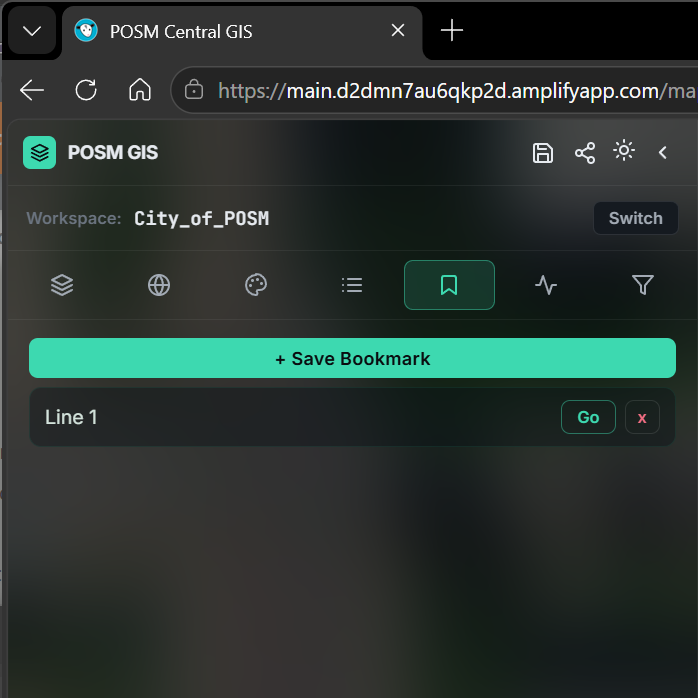
Use Bookmarks to save a map location and return to the same view later.
A bookmark saves the current map view, including the area and zoom level currently displayed.
Save a Bookmark
- Pan and zoom the map until the desired area is displayed.
- Open the Bookmarks tab.
- Select + Save Bookmark.
- Enter a name for the bookmark.
- Save the bookmark.
The saved bookmark appears in the list below the + Save Bookmark button.
Open a Saved Bookmark
To return to a saved map view:
- Open the Bookmarks tab.
- Locate the saved bookmark.
- Select Go.
The map moves to the location and zoom level stored with the bookmark.
Delete a Bookmark
To remove a saved bookmark:
- Open the Bookmarks tab.
- Locate the bookmark.
- Select the red X beside it.
Save frequently used areas
Bookmarks are useful for locations you return to frequently because they preserve the map view without requiring you to manually pan and zoom back to the same area.
Work Orders
Work Orders allow GIS features that need attention to be grouped into a field task.
A work order can collect mapped assets and related information so the appropriate features can be provided to a field crew.
Work Order Status Filters
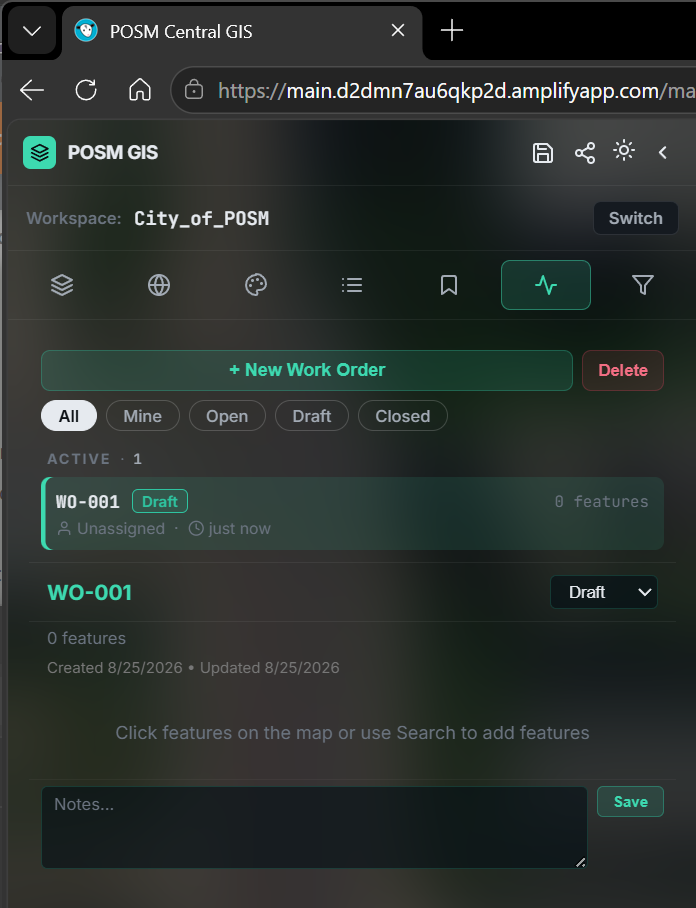
The Work Orders panel provides filters for reviewing work orders.
Available filters include:
- All
- Mine
- Open
- Draft
- Closed
Use these filters to locate work orders based on their current status or assignment.
Create a Work Order
To begin a work order:
- Open the Work Orders tab.
- Select + New Work Order.
- A new work order is created with Draft status.
- Add the GIS features that belong to the work order.
- Enter any applicable information in Notes.
- Select Save.
The Work Orders panel displays the number of features currently assigned to the work order.
Add GIS Features to a Work Order
GIS features can be added directly from the map.
- Click the desired GIS feature.
- Review the feature information.
- Select Add to Work Order.
- Select the appropriate work order.
Repeat this process to collect the assets that belong to the same field task.
SCREENSHOT NEEDED: Feature popup with the Add to Work Order drop-down open.
Work Orders and POSM Map Reader
Completed work orders can be used by POSM Map Reader (MR3) in the field.
The work order provides the field crew with the selected features, attributes, and map information needed to locate and review the applicable assets.
Asset IDs are important
Properly configured Asset ID, Start ID, and End ID fields help POSM Map Reader associate work-order information with the correct physical GIS assets.
Share a Map View
POSM Central GIS can create a link to the current map view.
The shared view can preserve information such as:
- Map location
- Zoom level
- Visible layers
- Symbology
- Selected basemap
SCREENSHOT NEEDED: Share Map View window.
GIS map sharing is different from inspection sharing
Share Map View shares a GIS map view.
It is separate from the POSM Central Share function used to provide another organization with access to inspection sessions or projects.
Create a Shared Map Link
- Configure the map the way you want the recipient to see it.
- Select Share from the GIS top bar.
- Create the shared map link.
- Copy or send the link using one of the available sharing options.
Available sharing options may include:
- Copy link
- Microsoft Teams
Shared Map Link Expiration
Shared GIS map links expire after 7 days.
After the link expires, create a new shared map link when access is still needed.
Shared views use live GIS data
The shared link preserves the map view that was configured when the link was created.
GIS data displayed through the shared view may continue to reflect the current data available to the map.
Save Your GIS Setup
Use the Save button in the GIS top bar to preserve your current map configuration.
Saved settings can include:
- Layer visibility
- Layer order
- Symbology
- Feature labels
- Other map display settings
Saving the setup allows POSM Central GIS to restore your preferred map configuration when you return.
SCREENSHOT NEEDED: GIS top bar with the Save button highlighted.
Save after customizing the map
After changing layers, symbology, labels, or other map settings, use Save when you want those settings available during a future GIS session.
GIS Feature Quick Reference
| If you want to... | Use |
|---|---|
| Open your organization's GIS map | POSM Central → Go To GIS |
| Show or hide GIS information | Layers |
| Change layer drawing order | Layers |
| Zoom to all features in a layer | Layers → Zoom to Layer |
| Add labels to mapped features | Layers → Labels |
| Change the background map | Basemaps |
| Change how GIS features are displayed | Symbology |
| Show pipe flow direction | Symbology → Show Flow Direction |
| Animate pipe flow direction | Symbology → Show Flow Pulse |
| Understand map colors and symbols | Legend |
| Quickly find an asset or value | Attribute Table Search |
| Browse GIS records | Attribute Table |
| Create a detailed multi-condition search | Advanced Search |
| Save a frequently used search | Advanced Search → Saved Searches |
| View information about a mapped asset | Click the GIS feature |
| Open an inspection report from a mapped asset | Feature information → report_link |
| Save a frequently viewed map location | Bookmarks |
| Return to a saved map location | Bookmarks → Go |
| Group GIS assets into a field task | Work Orders |
| Add a mapped asset to a work order | Feature information → Add to Work Order |
| Share the current GIS view | GIS top bar → Share |
| Preserve your GIS map configuration | GIS top bar → Save |
| Change GIS workspaces | Switch, when multiple workspaces are available |
GIS Configuration
POSM configures the GIS connection for the organization.
The exact GIS experience depends on the organization's available data and configuration.
Differences between organizations may include:
- GIS layers
- Layer names
- Attribute fields
- Asset types
- Symbology
- Labels
- Report links
- Workspaces
- Work-order information
Because of these differences, examples shown in this help site may not exactly match the GIS information available in your organization's workspace.
Need Help With POSM Central GIS?
POSM Support can assist with:
- Accessing POSM Central GIS
- GIS configuration
- Missing or incorrect GIS layers
- Asset information
- Report links
- Searches and filters
- Symbology
- Work Orders
- Shared map views
- Other GIS questions
You do not need to diagnose a GIS problem before contacting POSM Support.